How to Cross-Dock Items in Business Central
Cross-dock is receiving and fast-tracking items for shipping without placing them in storage bins. This process helps move the item through the put-away and pick activities while limiting the physical handling of goods that are due to be shipped, for example, because of back orders.
In this post, I explain how to use Cross-Docking in Business Central.
What is cross-docking?
Cross-docking is a warehouse technique where inbound tasks are immediately sorted and placed into a shipment area without needing storage. By cross-docking, warehouse teams reduce the need to store products and reduce picking time to facilitate deliveries.
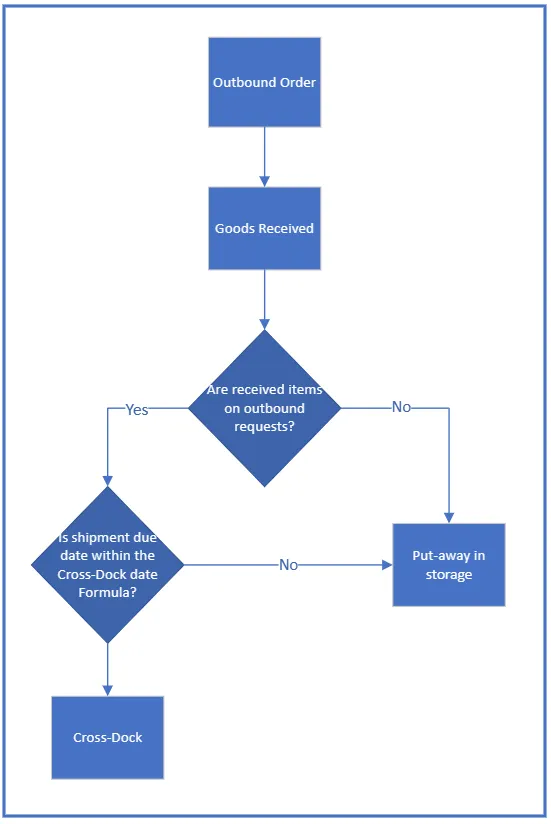
Cross-docking typically works on a set date formula that calculates the shipment due date against the item receipt date for which there are cross-dock opportunities. The cross-dock opportunity will be created if the receipt and the shipment due date are within the date formula and the shipment cannot be fulfilled with existing stock. For example:
A customer places an order, and the shipment date is the 30th of the month. There is no inventory available to fulfil the order. Therefore we must wait for the next scheduled receipt. We receive the item on the 29th of the month, one day before the customer’s order is due for shipment. Putting away the item into a storage place and picking it the day after might be a waste of time. Instead, we can cross-dock the item and place the quantity to ship into a cross-dock bin. From there, the team can pick the items and ship it.
However, cross-docking is not recommended if the item is received one week before the shipment. The cross-docking process is shown below:
This functionality, like Shipping and Receiving activities, requires different setups depending on the location. First, let’s start with simple WMS.
Cross-docking in a location with basic WMS: setup
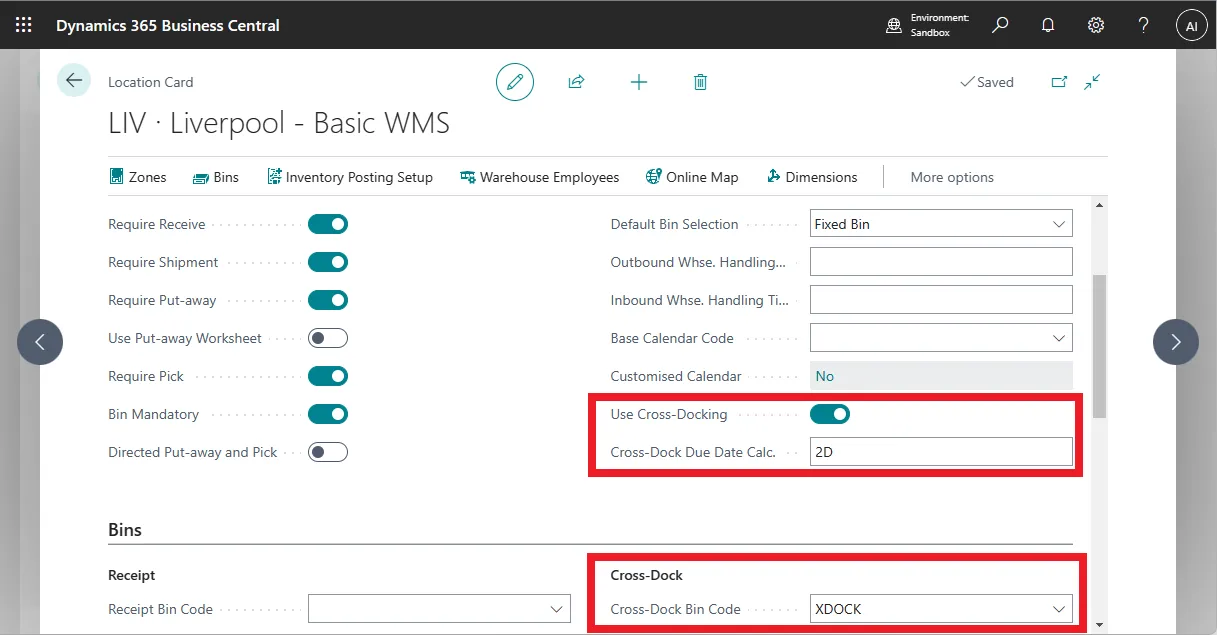
Locations with basic MWS require a default cross-dock bin, bins must be mandatory, and both require ship and receipts must be switched on. We also need to set up three additional fields:
- Use Cross-Docking must be enabled.
- Cross-Dock Due Date Calculation must have a date formula (leave it blank if you only want to cross-dock backorders).
- The Cross-Dock Bin Code must have a value.
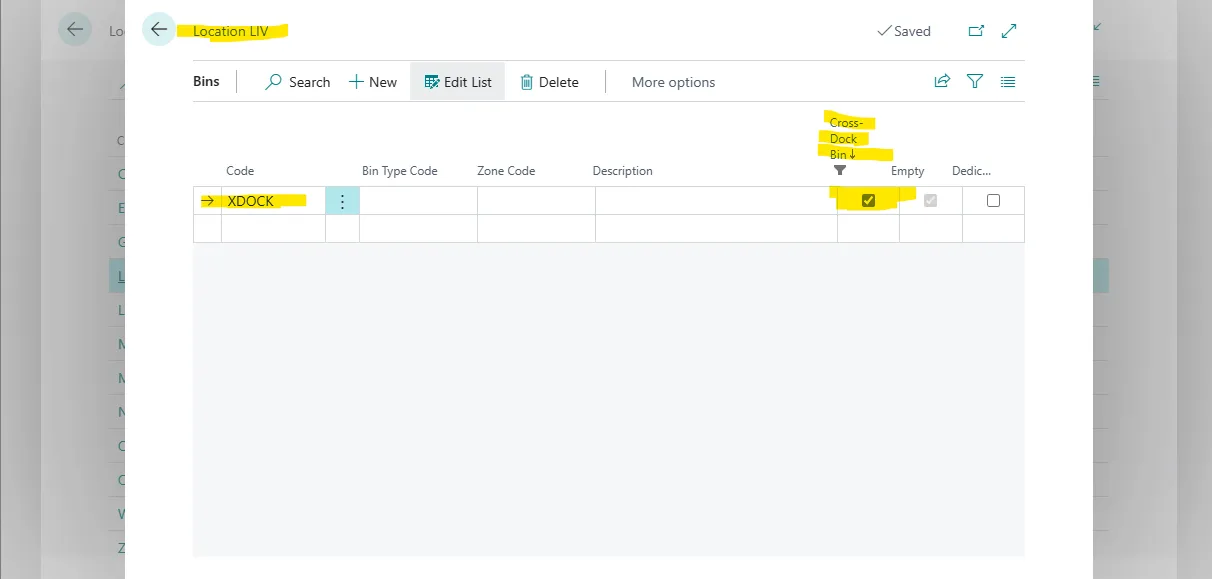
The cross-dock bin must also be set up as the cross-dock bin on the bin page.
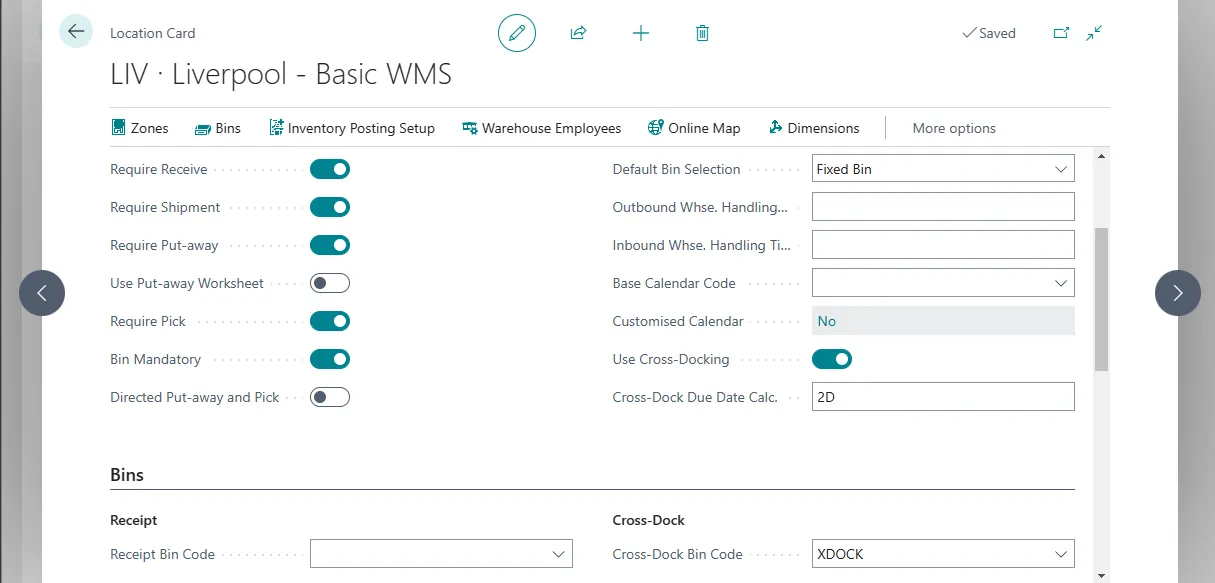
The picture below shows the correct setup in my location Liverpool.
Understand the cross-docking process
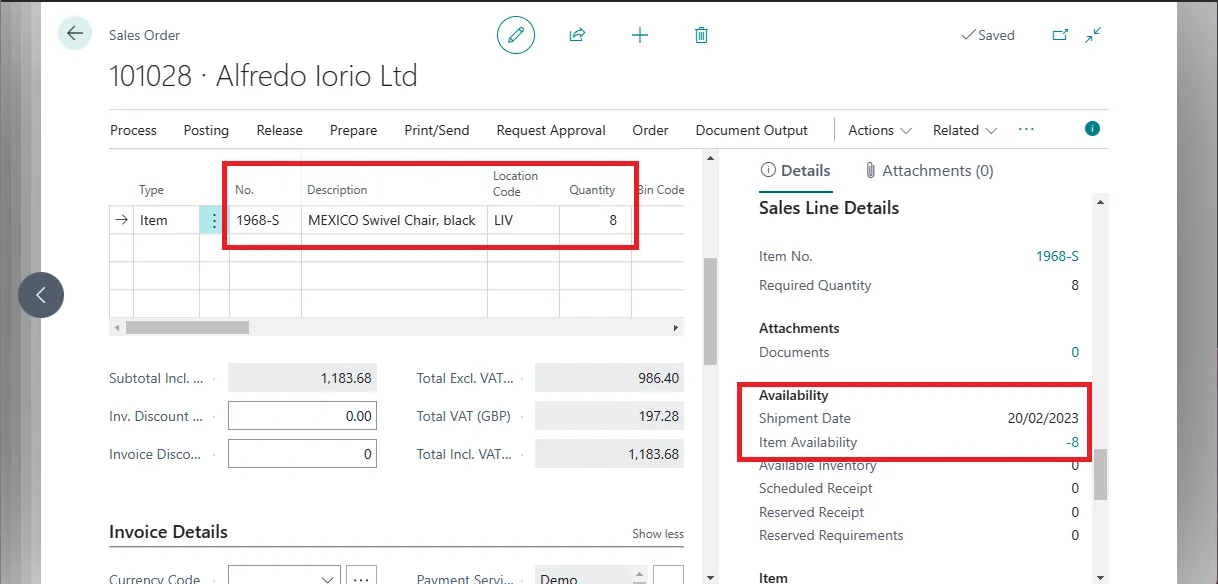
First, I create a sales order with a shipping date of 20 February 2023. The sales line FactBox shows negative availability, which means I don’t have stock available to ship this order.
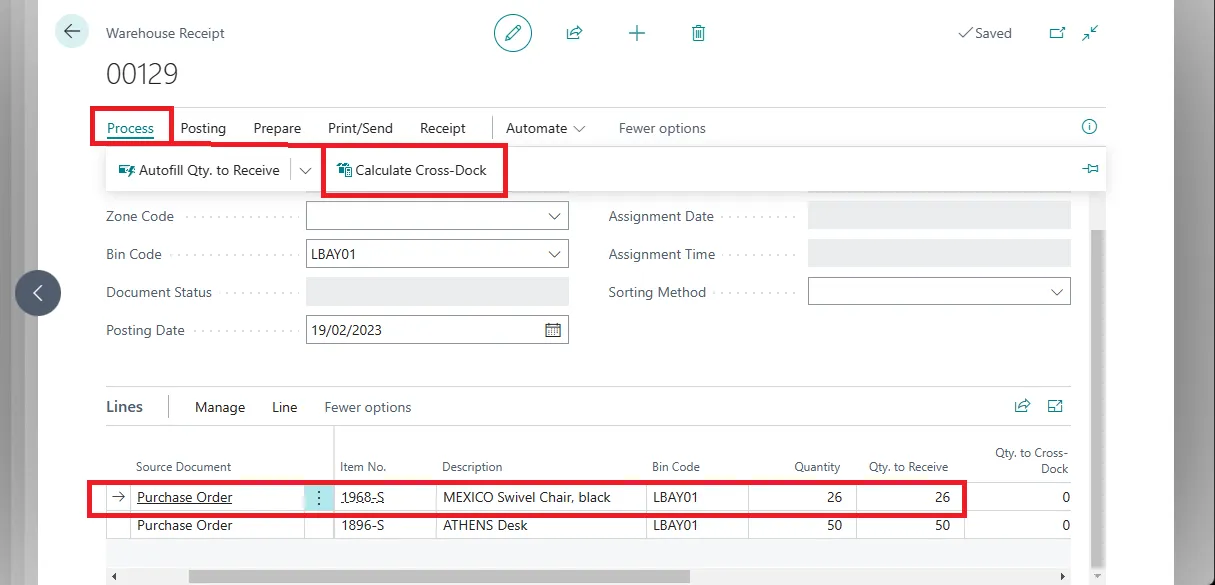
The next step is to receive the item 1968-S and cross-dock it in a warehouse receipt. The warehouse receipt below shows two lines for two separate orders; the first line contains 26 units of the item I must ship.
The action to calculate cross-dock is under the Process menu. The cross-dock calculation does not happen automatically in standard Business Central, though a simple extension can enable the feature to run automatically on a warehouse receipt line.
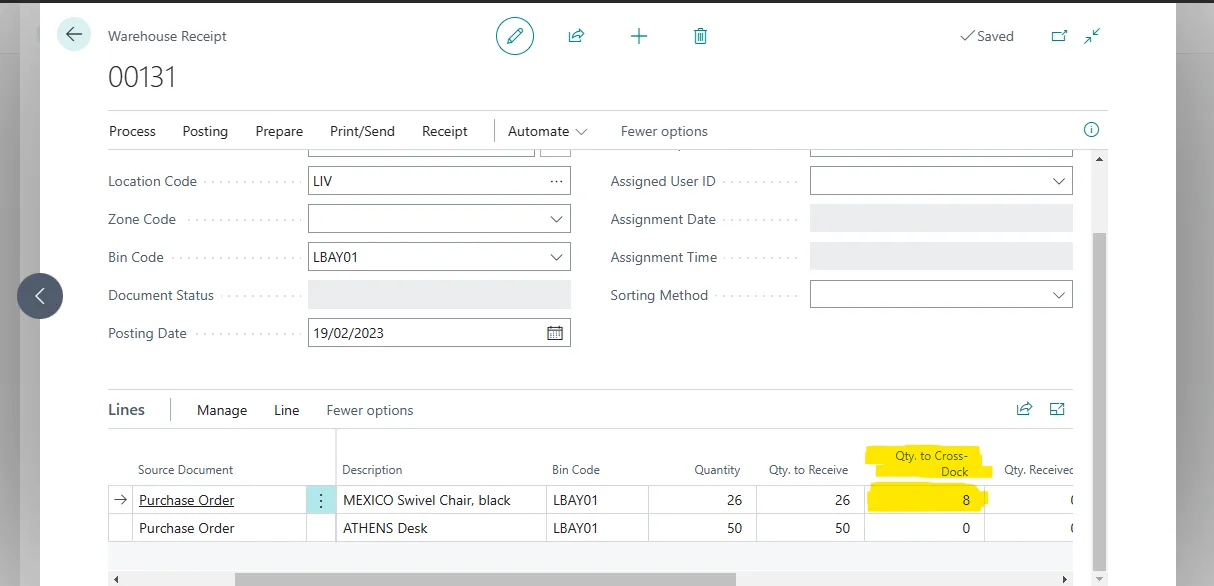
The functionality runs as expected, and the field “Qty. to Cross-Dock” now shows 8.
We can see the cross-docking details by clicking into the Qty to Cross-Dock field to open the Cross-Dock opportunity page. The picture below shows the page in my example. Note the page structure is divided into a header and lines.
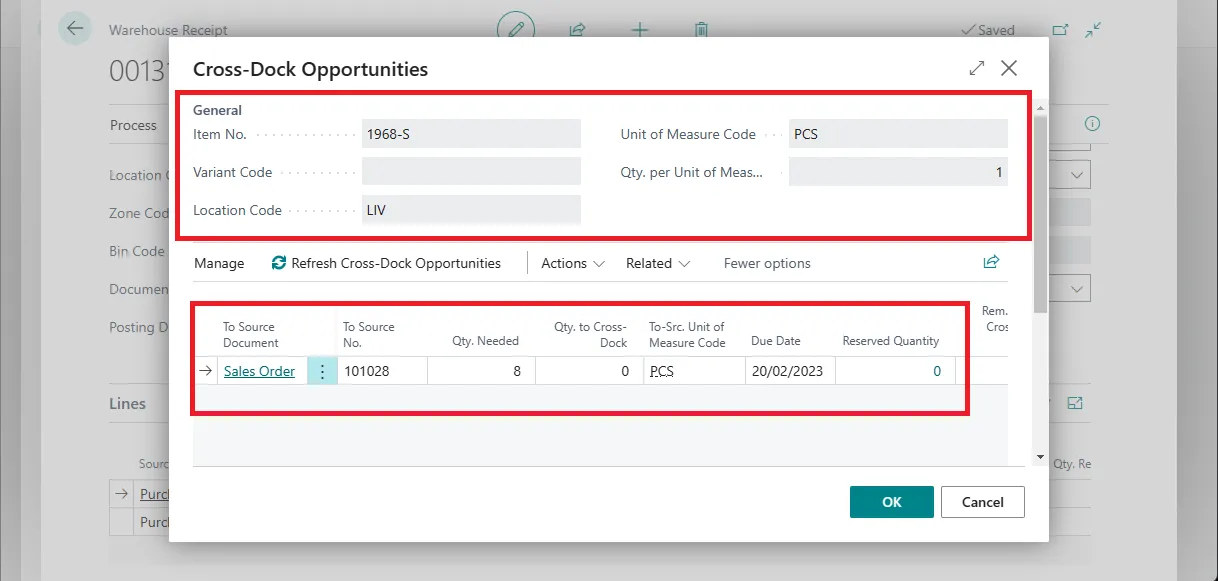
In the first part, we have the inbound activity details. In this example, the inbound is a receipt of item 1968-S in PCS (Pieces) unit of measure into my location LIV. At the bottom of the page, we have a list of outbound activities we can fulfil by cross-docking the item.
Note that the field Qty. to Cross-Dock shows 0. This is by design because warehouse users cannot cross-dock until they post the receipt line. We can manually update the field or use the autofill action, as shown below.
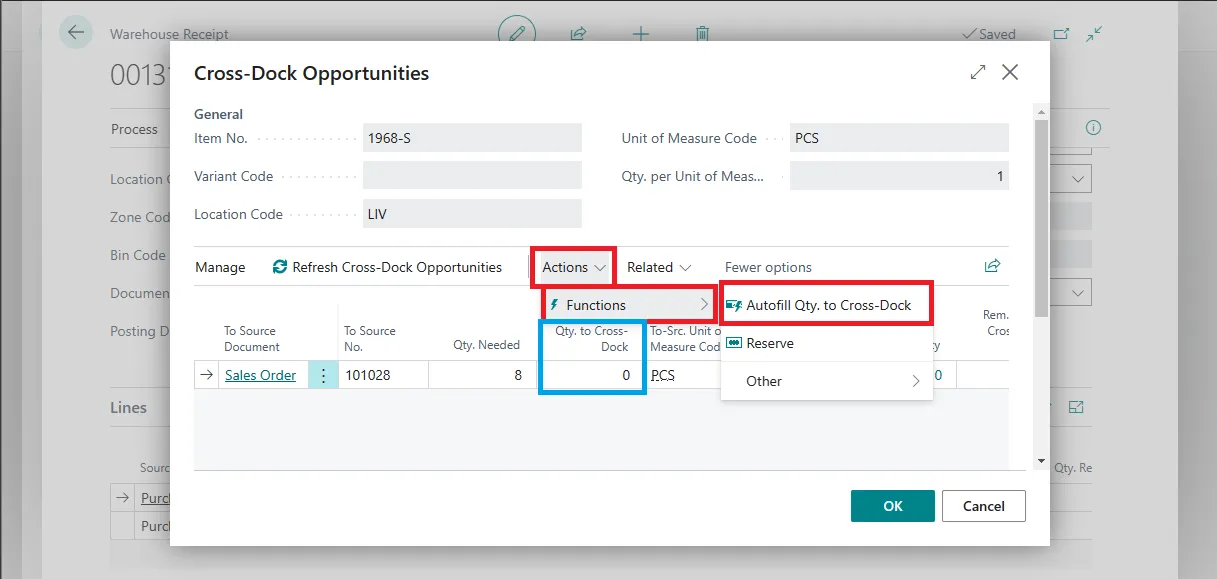
I can have more lines on this page if there are more outbound warehouse activities for the same item. Also, I can still add more outbound lines to be cross-docked before I post the receipt.
For example, suppose I release another sales order or a transfer that includes item 1968-S within the cross-dock date formula. In that case, I can use the “Refresh Cross-Dock Opportunities” to see new outbound activities I can fulfil with cross-docking.
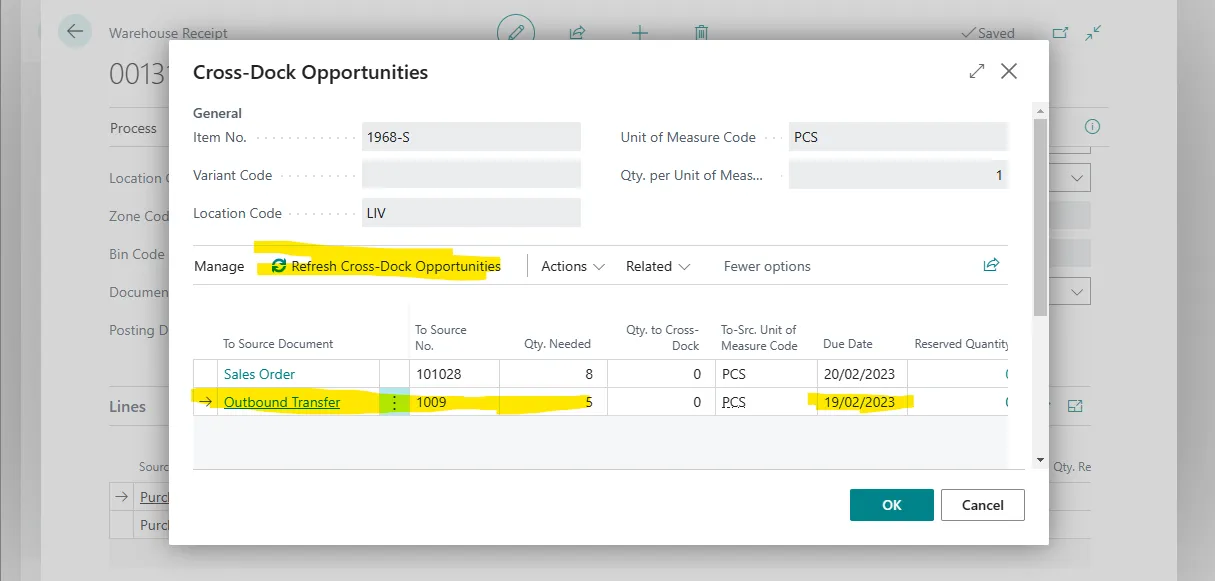
The next step is to post the warehouse receipt. This action will automatically create a warehouse put-away if you don’t use the put-away worksheet. For more details, see my article about receiving items here.
The warehouse Put-away document includes an additional cross-docking line to place 13 units of item 1968-S into a cross-dock bin; the rest will go to the default storage bin.
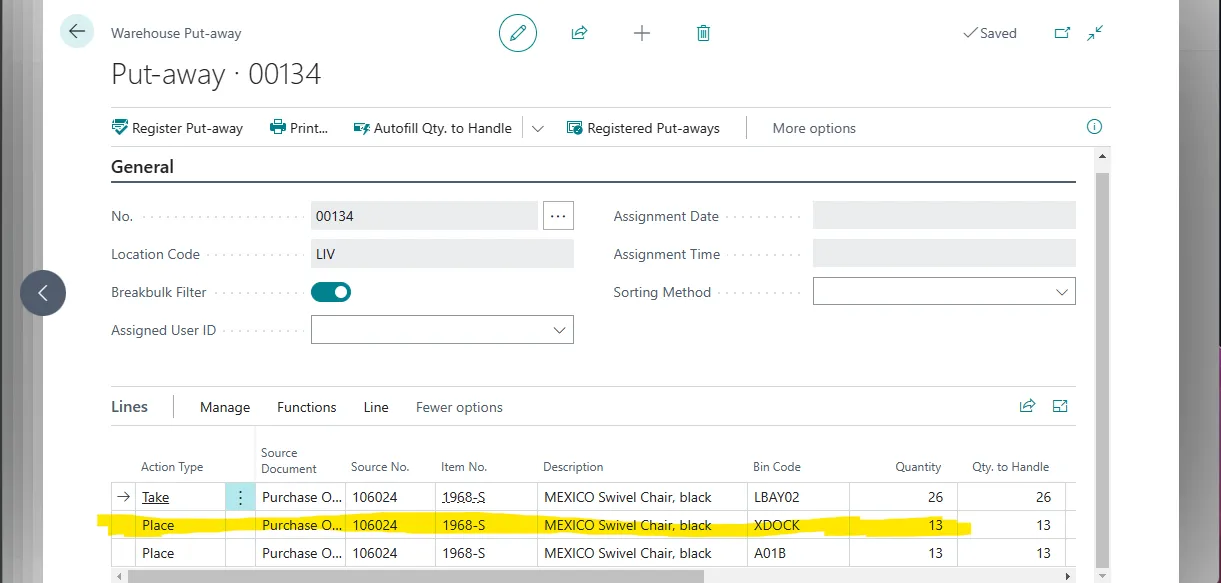
After registering the put-away, we can move to the final steps, the outbound process that includes picking and shipping the items.
I create a warehouse shipment and use the function Get Source Documents to populate the lines. I have two orders to ship, a sales and a transfer order; both documents contain item 1968-S to be cross-docked.
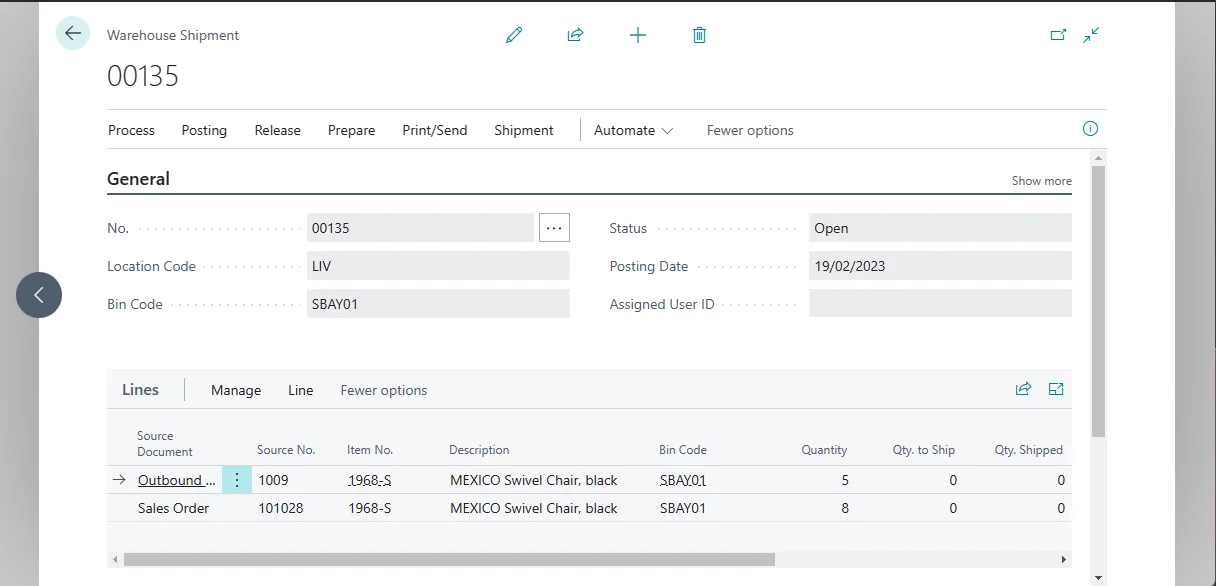
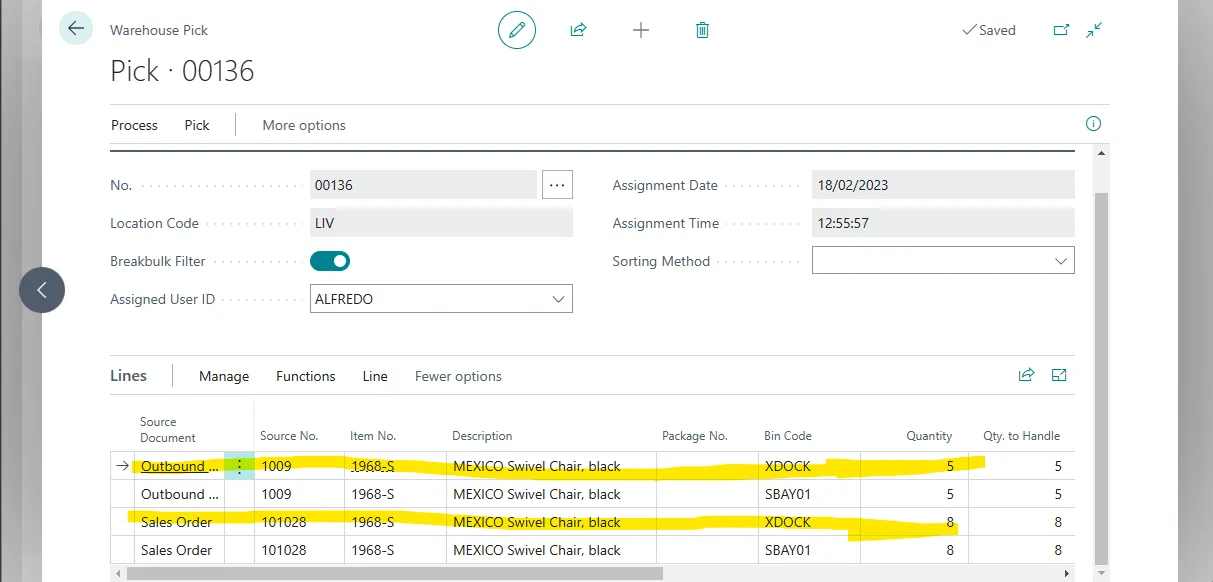
The warehouse document lines maintain the cross-dock link created when I posted the warehouse receipt. This link allows Business Central to select a cross-dock bin on the warehouse pick line when I create the pick instead of choosing the default storage or pickface bin. In the example below, my warehouse pick shows “Take” lines with the cross-dock bin.
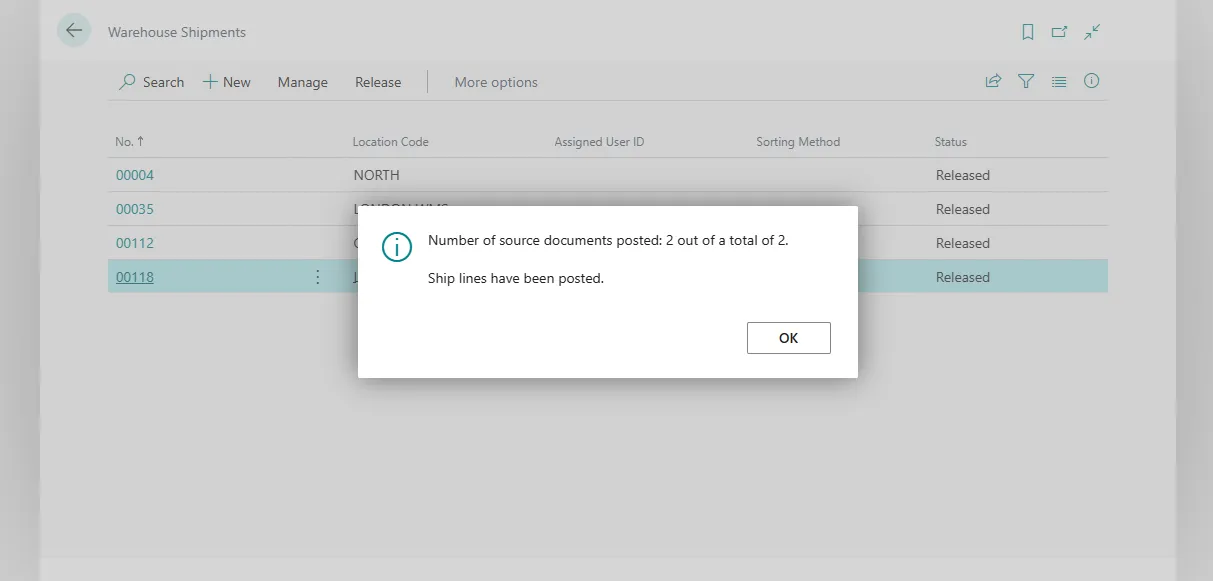
Lastly, I register the warehouse pick and post the shipment. Both order lines are shipped using the cross-docking functionality.
Cross-docking of backorders
Backorder items are always cross-docked if the location is set up with cross-docking regardless of the cross-dock date formula. This happens because the shipping dates on the order lines are past. Therefore, if the sales order line is not updated, cross-docking will identify backorder lines and cross-dock them.
Excluding items from cross-docking activities
Specific items can be excluded from the cross-docking functionality. Disable the field “Use Cross-Docking” in the item card to exclude items from being cross-docked. This field is enabled by default.
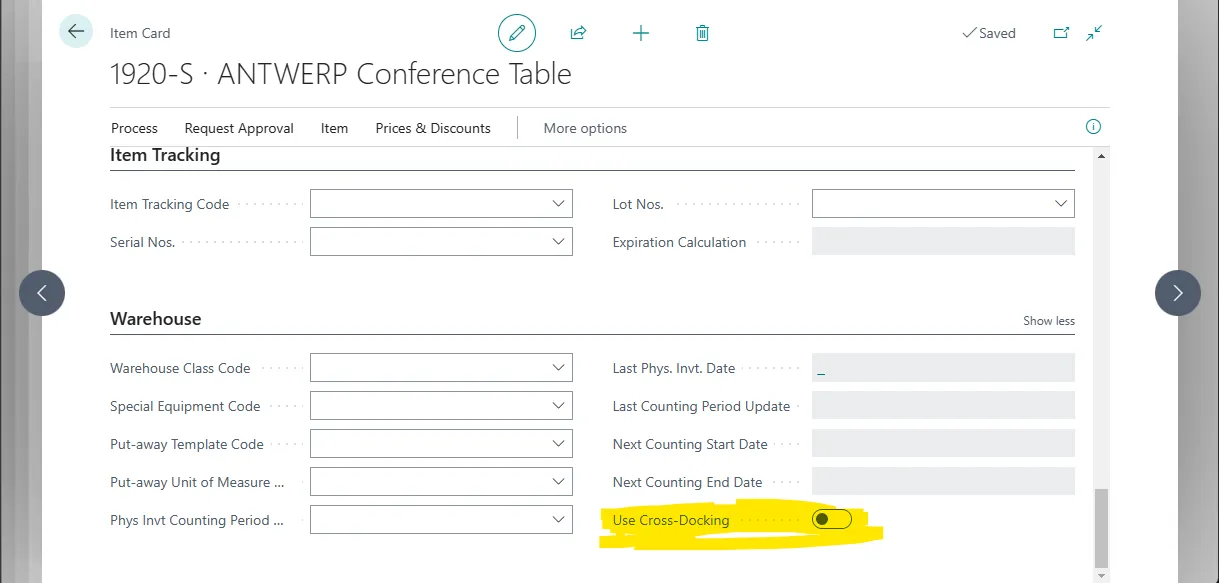
You might want to disable this field on items requiring strict quality control where it is better to store them in a storage location and check them before users can pick them.
Cross-docking in a location with Directed Put-away and Pick
The cross-dock process is the same in a location with full WMS. The difference is in the Cross-Dock bin setup.
The cross-dock bin must have a bin type that allows both put-away and pick. In my sandbox, I use a MISC code.
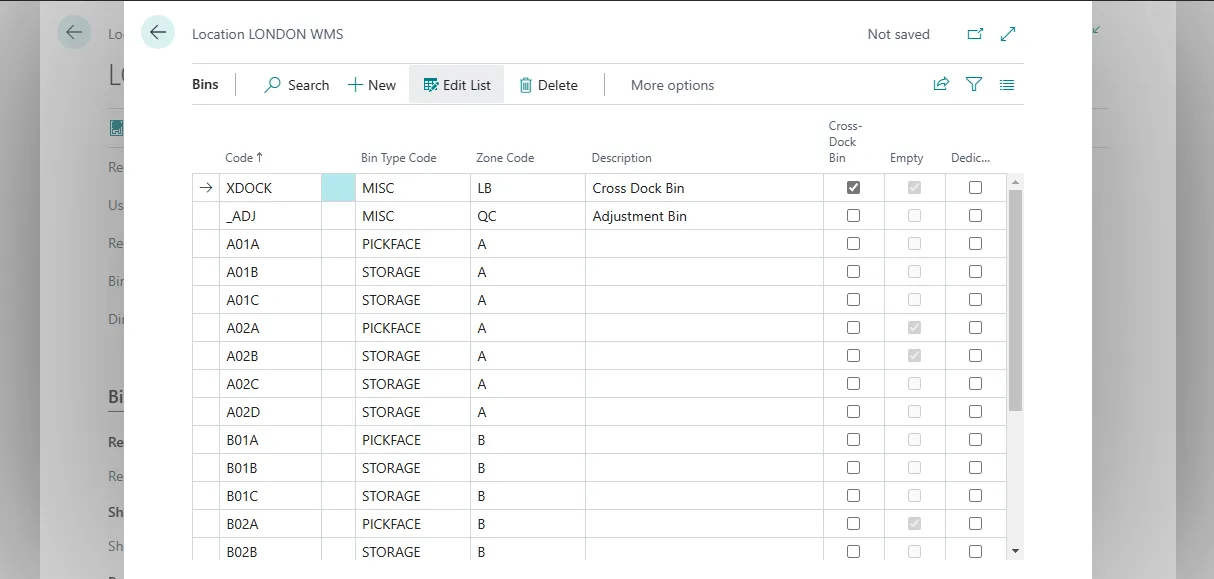
The Cross-dock bin must exist in a zone that is also set up for cross-docking.
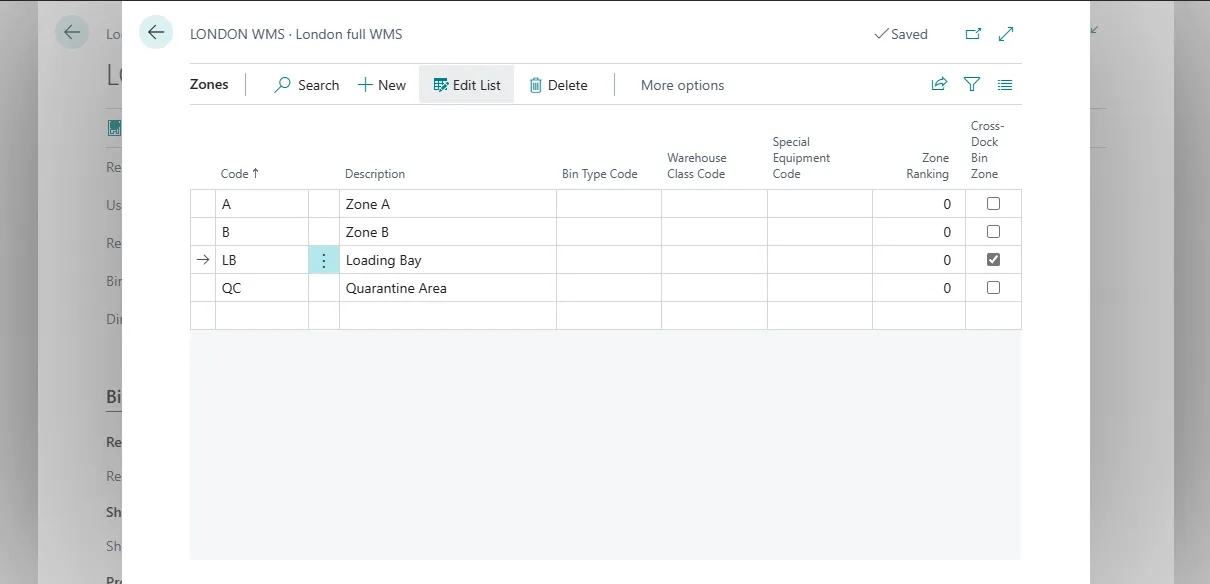
The setup only requires these two additional steps, and you can use the cross-docking functionality in a location with directed put-away and pick.
Closing thoughts
Cross-docking can help reduce warehouse movements when goods must be shipped shortly after receiving them. This feature sits well in a well-orchestrated warehouse where inbound and outbound tasks are planned and scheduled depending on the lead time. The warehouse layout must also make it easy to identify the cross-dock area where items are put away and picked.
Conversely, warehouses with more loose planning might not benefit from this feature, leading to inventory inaccuracy if the cross-dock is only a virtual bin in Business Central but does not exist as a physical place.